Step One: Clean out the cabinet!
I emptied out the cabinet and got rid of the stuff we wouldn't use and cleaned the bottom shelf really good. The trick to sticky tiles is to make sure the surface is really really clean!
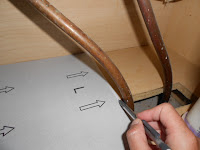
Step Two: Dry fit the tiles!
This is really important! You will probably need to cut the tiles to fit and you want your cuts to be as invisible as possible.As you can see I had about 1/2" over hang so I traced the line with a pencil so I'd know where to cut. This cut would become the back edge of my back tile to hide the cut.
Step Three: Cut the tiles!
Simply use a utility knife to score the back edge of the tile then flip and fold to cut the decorative coating.
Make your cuts around the pipes by marking out their general area with a pencil. I'd show you the step by step but your pipes won't be in the same place as mine so that would be a big fat waste of my time and yours! Just take your time and measure them out.
Step Four: Peel and stick!
You get it right! Be careful to line your edges up because sticky tiles are REALLY STICKY! HEHE! You don't want to get one to far out of place cause getting them up may not be an option without some serious adhesive remover.
TADA!!! The final result!
Not to shabby if I do say so myself! Now on to the next part of the project the "tension" rod bottle hanger.
I really liked the idea of a tension rod but when I got to thinking about it I realized the idea wouldn't quite work for me. My cabinet is pretty wide and we all know that tension rods aren't exactly known for their stability under weight. We all know that "HOLY CRAP" feeling when your shower one falls down and leaves you scared and naked in the corner of the shower! :) I liked the idea of a cheap curtain rod instead plus I could hang it in the dead space next to the garbage disposal.
Step One: Find one of these!
For some reason I have a TON of these lying around and extra hardware, enough to mount them on every window in a 20,000 square ft home! PERFECT.
Sadly it was to long for the spot I had envisioned so I just quick measured and took it apart and used a pair of tin snips to cut it to the length I needed.
Step Two: Hang the rod!
Just like you would in a window.
WooHoo! Now I could start filling my cabinet again! Now to all of you that may want to give me crap about all the "harsh cleaners" I have, you should know I've been finding Pinterest posts about making my own natural cleaners and have every intention of switching over. HOWEVER... we live on a budget and I am not going to waste the supplies I already have purchased. I proudly hung my spray bottles and tracked down some empty bins!


Great post! I had the same problem trying to use a tension rod under the sink. When you do convert to different cleaning products, save the sprayers from what you are now using. They work well to convert products such as vinegar to a spray bottles.
ReplyDelete