Wednesday, June 27, 2012

Knife block when you don't have a Circut

I thought this was a great way to pass an hour or so while my little guy sleeps and I'm waiting on client feedback! I don't have the time to wait or a way to get a circut letter ... So here we go!


 I grabbed my supplies and sat down in front of the TV. I started by painting my base a grey that is similar to our couch.


I printed our last name letter on the computer, cut it out and colored the back side with white chalk. Then I taped it onto the front of the knife block.


Then I traced the letter and you get what you see at the right! Pretty neat! So I was off and painting by hand using a tiny little brush!


Here is the painting done!

The final product...


I have two knife blocks because we live in steak country and we do love a steak so I repeated the whole process for the other one. 

My new Knife Blocks!


I may decided to add a coat of acrylic high gloss poly but I kind of like how they look now!

Garden Baskets of Fun!

Can you tell I'm waiting on feedback from a client today??? I loved the idea of this post. What a creative alternative to those corner stuffed animal holders! So I hit the shed and grabbed two planters and went to work! Quick and easy! Loved how it went with my little guys western rustic room!

Under The Sink Revamp

So I've been doing "some" (because the reality is I can't get to one project a day, if I don't work I don't eat) of the 21day challenge from A bowl full of lemons and today it was under the kitchen sink day! I really liked this post I found on Pinterest about putting down sticky tiles and we just happened to have some left from another project we had done in an upstairs bedroom so I used that, and I loved this post using a tension rod to store spray bottles so I used a "version" of that. 


Step One: Clean out the cabinet!

I emptied out the cabinet and got rid of the stuff we wouldn't use and cleaned the bottom shelf really good. The trick to sticky tiles is to make sure the surface is really really clean! 


Step Two: Dry fit the tiles!

This is really important! You will probably need to cut the tiles to fit and you want your cuts to be as invisible as possible. 


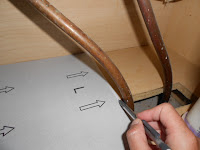
As you can see I had about 1/2" over hang so I traced the line with a pencil so I'd know where to cut. This cut would become the back edge of my back tile to hide the cut. 


Step Three: Cut the tiles!

Simply use a utility knife to score the back edge of the tile then flip and fold to cut the decorative coating. 


Make your cuts around the pipes by marking out their general area with a pencil. I'd show you the step by step but your pipes won't be in the same place as mine so that would be a big fat waste of my time and yours! Just take your time and measure them out. 


Step Four: Peel and stick!

You get it right! Be careful to line your edges up because sticky tiles are REALLY STICKY! HEHE! You don't want to get one to far out of place cause getting them up may not be an option without some serious adhesive remover. 


TADA!!! The final result!

Not to shabby if I do say so myself!  Now on to the next part of the project the "tension" rod bottle hanger. 


I really liked the idea of a tension rod but when I got to thinking about it I realized the idea wouldn't quite work for me. My cabinet is pretty wide and we all know that tension rods aren't exactly known for their stability under weight. We all know that "HOLY CRAP" feeling when your shower one falls down and leaves you scared and naked in the corner of the shower! :) I liked the idea of a cheap curtain rod instead plus I could hang it in the dead space next to the garbage disposal. 

Step One: Find one of these!

For some reason I have a TON of these lying around and  extra hardware, enough to mount them on every window in a 20,000 square ft home! PERFECT.


Sadly it was to long for the spot I had envisioned so I just quick measured and took it apart and used a pair of tin snips to cut it to the length I needed. 


Step Two: Hang the rod!

Just like you would in a window. 


WooHoo! Now I could start filling my cabinet again! Now to all of you that may want to give me crap about all the "harsh cleaners" I have, you should know I've been finding Pinterest posts about making my own natural cleaners and have every intention of switching over. HOWEVER... we live on a budget and I am not going to waste the supplies I already have purchased. I proudly hung my spray bottles and tracked down some empty bins!

TADA!!! Pretty ain't it!


Tuesday, June 26, 2012

New Twist on the Old Diaper Cake

So there must be something in the water in our little town because just about every single friend I know is having or has recently had a baby! I was constantly going to baby showers including my own! I love seeing the traditional diaper cake show up but after being inspired by this little diddy I wanted to give it a shot!


So here is my first attempt at the diaper cradle! Not to shabby if I do say so myself! You can read on my pin what I used. It was a lot easier than I really thought it would be! I gave this one as a gift to my friend Telena who is currently on bed rest awaiting her little one any day!!!


So this one got me thinking I really like these but felt like I was copping out a little. So when I got my invitation to my friend Nikki's shower I knew I wanted to do something similar but wanted to include my "can't live withouts" as a new mommy! So I decided to do a twist on a diaper cake yet again!


I started with a "media" basket that I got at target its a little longer than a traditional basket. This is important! It leaves room for my "can't live withouts"! I then filled the backend with rolled up diapers. (forgive me I got so excited I forgot to photograph this part) I covered the top with a pillow case folded in half and tied it with ribbon.


I then got my stash of "can't live withouts" I picked up at target. (I am very partial of the munchkin brand. They have some pretty useful stuff!) Then it was off and packing. 


So the finished product! Pretty cute and I didn't feel like I copped out with just a package of diapers and some blankets! I think next I wanna try a "covered wagon" one....


Holy Cow Here We GO!

So just like everyone else I'm addicted to pinterest...I know I know what a follower! So I wanted a place to share the realities of my own home organization and projects I've tried to complete. So off we go into the wild blue yonder!


Project 1

Problem: My lower kitchen cabinet that holds all my pans cookie sheets ect. is a royal fat mess....


Of course I went straight to Pinterest to find a solution! I found several sites that showed beautiful designer kitchens with drawers specifically designed for this type of thing but who are we kidding the odds of me being able to complete a task like that are slim to none. I liked the idea of this post from Better Homes and Gardens using tension rods. I really liked the option of being able to customize the width of the slots for each pan but as you can see I have the dreaded....short shelf in the back of my cabinet. It holds our disposable dinner ware for cook outs (because the reality is I don't do dishes well). I also have a kitchen the size of a peanut... seriously...its only 10' by 7'... and the cabinets, appliances, and sink take up most of that space! I have to use every little nook and cranny to keep what I need in the kitchen!


So one of the points of my blog is to use what you have... if I had money to buy baskets and bins for everything my house would look like a magazine cover too! So I went looking... and found this little guy in my old office supplies I don't use anymore.

PERFECTION! Its an old file holder I don't use. The little metal dividers can be moved to fit. You can find these at pretty much any office supply place or find one online. I got mine at Basically Business in Wray, CO! (Love you Aunt Cinder) I don't remember what it cost but right now to me its a free easy solution!


Now is the point where I start to sweat bullets... will it even fit in the cabinet??? Dear God Please let it fit in the cabinet!!!

WOOHOO! If that wasn't the perfect solution I don't know what would have been. The metal dividers are shorter than the dreaded half shelf and I have about 1/2" on each side to spare!


I decided the disposable dinner ware needed to be corralled cause I always end up dumping the silverware everywhere when trying to get it out. So I went looking for something to help with that and found two dollar store bins in the basement that I was going to garage sale.


Now I was off and organizing! I moved the little metal dividers where I needed them and packed the bins!


Solution: Here is the final product! I am so excited! I still had to nest some of my baking pans but at least I wouldn't be worried about breaking my stoneware and glass pan any more!


I even have some room to spare which I'm sure I will quickly fill up. It will be so nice to not have an avalanche of pans every time I cook! Hope this helps you those of you with the dreaded short shelves!